How to generate unlimited images with your windows PC for free with comfyUI.
1. Install or Check Python 3.10
- Open Command Prompt (CMD) or PowerShell:
- Click the Windows “Start” button, type
cmdorpowershell, then press Enter.
- Check if Python is installed:
- In the CMD/PowerShell window, type:
bash python --version - If Python 3.10 (or a higher 3.x version) is already installed, you’ll see something like:
Python 3.10.11 - If it’s not installed or you have a version lower than 3.10, proceed to the next step.
- Install Python 3.10:
- Go to the Python Downloads page.
- Download the Windows installer for Python 3.10.
- Run the installer.
- Important: On the first installation screen, tick the “Add Python 3.10 to PATH” option so you can access
pythonfrom anywhere.
- Verify installation:
- Re-open CMD or PowerShell and type:
bash python --version - Confirm that it shows
Python 3.10.x.
2. Install Git (Optional, but Recommended)
Git makes it easy to clone (download) repositories and keep them updated. If you want to use a ZIP download instead, skip this step.
- Download Git:
- Visit Git for Windows.
- Download the installer and run it.
- Follow the installation prompts:
- Usually, the default settings are fine for most users.
- After installation, you can open Git Bash or use Git from the Windows CMD/PowerShell.
3. Setting Up ComfyUI
3.1. Create a ComfyUI Folder
Pick or create a folder where ComfyUI will live. For example:
C:\AI\ComfyUINote: You can store it wherever you like, just remember the path.
3.2. Download/Clone ComfyUI
- Method A: Clone with Git
- Open CMD/PowerShell in your chosen folder.
- If you’re in Windows Explorer, you can click inside the address bar, type
cmd, and press Enter to open a command prompt in that folder.
- If you’re in Windows Explorer, you can click inside the address bar, type
- Type:
bash git clone https://github.com/comfyanonymous/ComfyUI.git - This creates a
ComfyUIsubfolder with all the necessary files.
- Method B: Download as ZIP
- Go to ComfyUI on GitHub.
- Click the green “Code” button, then “Download ZIP.”
- Extract the contents into
C:\AI\ComfyUI(or your chosen folder).
3.3. Install Dependencies
- Navigate to the
ComfyUIfolder (using CMD/PowerShell).
- Example:
bash cd C:\AI\ComfyUI
- Install requirements:
pip install -r requirements.txt- You’ll see lots of messages like “Successfully installed …”. If everything goes right, no major errors will appear.
3.4. Test Run ComfyUI
- Still in the
ComfyUIfolder, type:
python main.py- Watch the CMD window. After a short while, you’ll see something like:
Running on http://127.0.0.1:8188- Open a web browser (Chrome, Firefox, Edge, etc.) and go to:
http://127.0.0.1:8188- You should see the ComfyUI interface load up in your browser. If you do, congratulations — ComfyUI is installed and running!
4. Installing ComfyUI Manager
The ComfyUI Manager extension makes managing other extensions or custom nodes much simpler by giving you a graphical interface right inside ComfyUI.
4.1. Open ComfyUI’s custom_nodes Folder
By default, ComfyUI may have a folder called custom_nodes. If it doesn’t exist, create it:
C:\AI\ComfyUI\custom_nodes4.2. Download/Clone ComfyUI Manager
- Method A: Git Clone
- Open CMD/PowerShell in
custom_nodes:bash cd C:\AI\ComfyUI\custom_nodes - Clone ComfyUI Manager:
bash git clone https://github.com/ltdrdata/ComfyUI-Manager.git - You’ll end up with a folder named
ComfyUI-Managerinsidecustom_nodes.
- Method B: Download ZIP
- Go to ComfyUI-Manager GitHub page.
- Click “Code” > “Download ZIP.”
- Extract it to a folder named
ComfyUI-Managerunder:C:\AI\ComfyUI\custom_nodes
Your folder structure should now look like:
C:\AI\ComfyUI
  ├─ custom_nodes
  │  └─ ComfyUI-Manager
  ├─ main.py
  ├─ requirements.txt
  └─ ...
4.3. Restart ComfyUI
- If ComfyUI is still running in your CMD window, press Ctrl + C to stop it.
- Type:
python main.py- Let it load again.
- Return to
http://127.0.0.1:8188in your browser. - Look for the ComfyUI Manager UI element. Depending on the version, you might see:
- A new tab labeled “ComfyUI Manager”
- Or an icon somewhere on the main interface.
Tip: Once you see the ComfyUI Manager tab, you can click it to see a list of available, installed, or updatable extensions!
5. Installing RealvisX
RealvisX is a collection of custom nodes that enhance image generation options in ComfyUI. You can install it two ways: using ComfyUI Manager or doing it manually.
5.1. Using ComfyUI Manager (Easier Method)
- Open ComfyUI in your browser:
http://127.0.0.1:8188- Go to the ComfyUI Manager tab:
- You may see a list of curated or popular repositories.
- Find “RealvisX” in the repository listings (or add the GitHub link if it’s not in the list).
- The GitHub link is: https://github.com/RealvisReal/RealvisX
- Click the “Install” button next to RealvisX.
- Wait for the installation logs to finish. You should see a success message when it’s done.
5.2. Manual Installation
- Open your
custom_nodesfolder again:
C:\AI\ComfyUI\custom_nodes- Download or clone RealvisX:
- Git:
bash git clone https://github.com/RealvisReal/RealvisX.git - ZIP:
- Go to the RealvisX GitHub page: RealvisX Repo.
- Click “Code” > “Download ZIP.”
- Extract it to
C:\AI\ComfyUI\custom_nodes\RealvisX.
- The folder structure might now look like:
   C:\AI\ComfyUI
     ├─ custom_nodes
     │  ├─ ComfyUI-Manager
│ └─ RealvisX- Restart ComfyUI (Ctrl + C in the terminal, then
python main.pyagain).
6. Generating Images with RealvisX
After installing RealvisX:
- Confirm the RealvisX nodes are loaded:
- In ComfyUI, you can open the node menu (often a button in the top-left corner or a panel you expand) and look for categories or nodes labeled with “Realvis” or “RVX.”
- If you see them, you’re good to go!
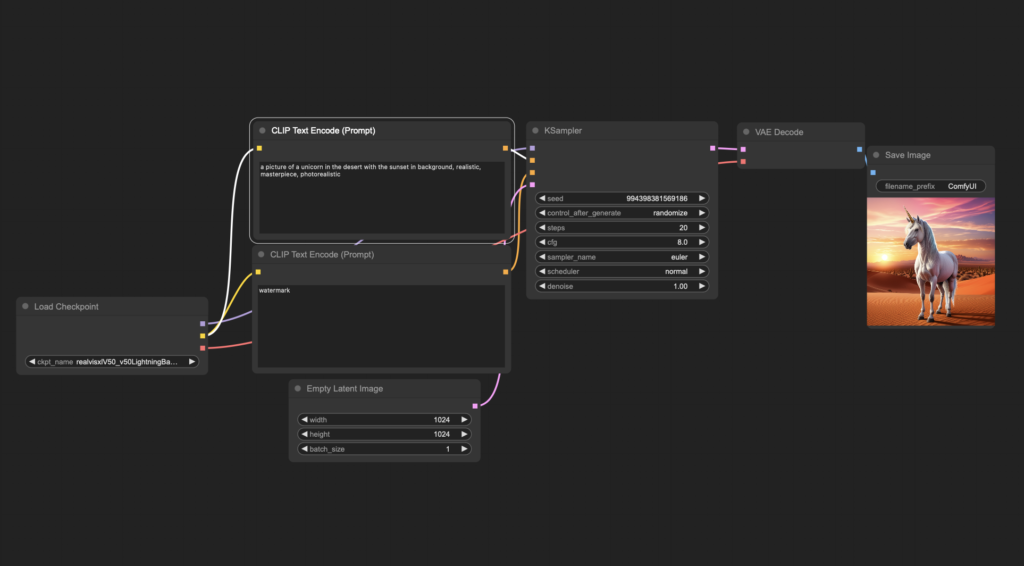
- Create a basic workflow:
- For a simple test, open the Nodes menu on the left side (or top menu in some versions).
- Drag out a Sampler or Generator node (depending on your workflow).
- Drag out RealvisX nodes you wish to test. (They might do tasks like advanced merges, morphological changes, etc.)
- Connect the nodes together. Typically, you’ll have:
- A model loader node (select which Stable Diffusion model you want),
- A prompt node (type your prompt),
- RealvisX nodes (if relevant),
- A sampler node, and
- An image output viewer node.
- Enter your prompt and settings:
- For example, you could type something like:
A cinematic portrait of a warrior wearing futuristic armor, realistic details, 4K - Adjust resolution, steps, sampler type, etc., in the Sampler node or anywhere else required.
- Execute the workflow:
- There should be an “Execute” button (often top-left or near the top of the canvas). Click it.
- Watch the progress in the CMD/PowerShell window. You’ll see lines like:
[INFO] Generating image ... [INFO] Steps completed: 10/20 - When done, the output viewer node will display your generated image right in ComfyUI.
7. Tips & Troubleshooting
- Using a Virtual Environment:
- Some users prefer installing everything in a self-contained environment. For example:
bash python -m venv venv .\venv\Scripts\activate pip install -r requirements.txt - This keeps your system-wide Python clean and prevents version conflicts.
- Potential Windows Dependencies:
- Sometimes, you may need C++ Build Tools if a Python package requires compilation. If you get an error like “Microsoft Visual C++ 14.0 or greater is required,” download and install Build Tools for Visual Studio.
- Updating:
- If you cloned via Git, you can pull updates by:
bash git pull
from the respective folder (ComfyUI,RealvisX, etc.). - Then reinstall dependencies if needed:
bash pip install -r requirements.txt - If you used the ZIP method, just re-download the ZIP, overwrite the old files, and repeat the installation steps as needed.
- Common Issues:
- “Cannot import module …” or “No module named …”:
- Double-check you’re in the correct folder and installed dependencies with
pip install -r requirements.txt. - Make sure you’re using Python 3.10 (or at least 3.10.x).
- Double-check you’re in the correct folder and installed dependencies with
- Port conflicts:
- If
127.0.0.1:8188doesn’t load, maybe the port is in use. Search the ComfyUI docs for changing the port or just close other apps that might be using it.
- If
Conclusion
That’s everything you need to know to install ComfyUI on Windows, add the ComfyUI Manager for extension management, and set up RealvisX to start producing awesome images.
Now that you’re all set:
- Experiment with different Stable Diffusion models and node setups.
- Try out RealvisX features to improve or customize your image generation pipeline.
- Share your results with the community, and explore other custom nodes to expand your creative possibilities.
Happy Creating!